Problem
Sometimes it happens that an application in the browser always throws an exception as soon as a file has been loaded. This may be due to different user credentials of the web server and the file server and the correct setting in the IIS. In the following, the correct procedure is explained using the example of an ASP.NET application without a database.
Preparation
- First, the project should be compiled in Visual Studio under "create" and "publish project".
- A new profile must then be created or an existing one used. For connection (for the publishing method), "file system" and the storage location should be selected.
- The next step is to set the configuration to release and publish the project.
- Finally, the compiled file should be placed in the wwwroot folder of the desired web server and the IIS should be started. After this step, the folder should now be in the directory of the IIS.
IIS configuration
If it is not clear beforehand, then it should be checked whether asp.NET has been activated under the features. This can be found under "Internet Information Services -->WWW Services --> .NET Extensibility 4.6 and ASP.NET 4.6.". In the next step, the IIS Manager should be started. The project should now be found under Default Web Site.
At this point comes the most important part of the setting in IIS, so that the user can access data on another file server. The application user must always correspond to the user of the file server, otherwise no access is possible. The user can be set under the application pools.
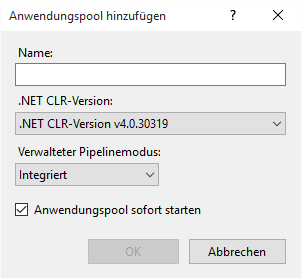
.NET CLR version v4.0 should be present by default, as well as that the managed pipeline mode is set to integrated. Click on "Ok" and the pool is activated and started.
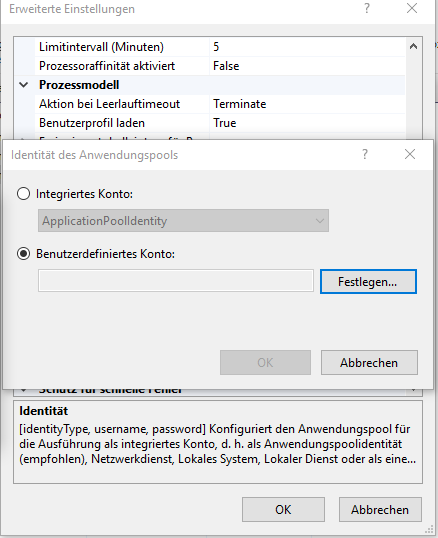
In this step, right-click on the newly created pool and select "Advanced Settings" and "Identity". The user should be set to "manual".
- In the application under Default Web Site, "converted to application" and the correct application pool should be selected.
- A virtual directory is then created that allows access to a file server. A new virtual directory should be created in the application (by right-clicking) and an alias entered.
- In this step, the same user must be entered for "connect as..." as in the previous step for the application pool. Now confirm and the application can be started.
With this procedure, there should be no problems if the file and web servers are separate from each other, with different users and no longer throw an exception.
Further contents

antares RiMIS® LkSG software
As of 01.01.23, corporate responsibility for compliance with human rights along supply chains is to be regulated for the first time. The new Supply Chain Due Diligence Act (LkSG) is closely linked in organizational terms to corporate risk management.

Efficient risk management by means of simulation
Simulations are a suitable tool to aggregate quantified risks and opportunities. antares RiMIS® offers the possibility to simulate risks and opportunities with a special distribution adapted to practical considerations in addition to the usual distribution functions.

Monte carlo simulation
Companies face a variety of constantly changing risks every day. Summarize your risks using probability distributions and visualize the results. Identify risk scenarios and initiate countermeasures.

Risk aggregation and quantification according to IDW PS 981 & PS 340
Only those who know their specific challenges and are well prepared for crisis situations can take advantage of potential opportunities. Discover our practical workshop for risk managers and controllers now! The workshop contents take into account the IDW requirement.
Introduction of risk management software in times of Corona
An interview with the controlling manager of Marquard & Bahls AG about the implementation of antares RiMIS® in a challenging time. The company employs around 6,700 people worldwide and has subsidiaries in more than 30 countries.

IDW auditing standard 340
The Institute of Public Auditors in Germany (Institut der Wirtschaftsprüfer, IDW) acts in the interest of German auditors and sets standards for risk management in IDW PS 340. Due to a new regulation, companies are now facing new challenges in practical implementation.

Expert estimates in risk analysis
What is meant by "risk analysis", which distribution types are available for modeling risks and in which cases are expert estimates needed? We address these and many other topics in "Expert Estimates in Risk Analysis".

Risk management system
Make sound business decisions with our GRC solution antares RiMIS®.

Risk management process at a glance
Avoid risks and seize opportunities. Successful corporate governance with an effective risk management process. Integrate risk management system.

The evolution compliance
The term "compliance" describes the observance of legal regulations and guidelines by companies. To meet these requirements, a systematic, company-wide compliance management system must document, implement and maintain.

Compliance and mid tier
What constitutes the topic of compliance? Is this topic only relevant for "global players"? These and other questions are answered by the expert Prof. Dr. Roland Franz Erben (Professor of Business Administration at the Stuttgart University of Applied Sciences (HfT)) in an exciting guest article.

Information security management according to TISAX®
The TISAX® standard for information security has been in force since 2017. Suppliers and manufacturers have been requiring this certification from their partners ever since. We help to permanently manage, control, maintain and continuously improve information security.

Certification according to ISO/IEC 27001
Through ISO 27001 certification of the existing information security management system (ISMS), companies or scopes demonstrate that information security requirements and data protection measures have been met and implemented.

Management information system
Successful corporate management and secure controlling with a management information system: Analyze and evaluate data and visualize it in the form of reporting. An indispensable basis for the continuous supply of information with decision-relevant data.

GDPR checklist
In May 2018, the new General Data Protection Regulation (GDPR) became binding in the European Union. These requirements pose new challenges for companies of all industries and sizes in handling data. Violation of these principles can lead to heavy fines.

Whistleblower system
Whistleblowers or so-called whistleblowers publish confidential information or documents. As a result of the new Whistleblower Protection Act (HinSchG) and the preceding EU directives, there is an express obligation to set up a reporting office to protect these persons.
